Saturday, April 28, 2018

Rip Blu-ray/DVD to Sony Xperia XZ Premium

The Sony Xperia XZ Premium has everything you want when paying top dollar for a phone, with its 4K display and slow motion camera two standout party pieces. It will please Sony fans around the world. It boasts a market-leading 4K display, the latest high-end power under the hood and Sony's professional photography heritage, including super slow motion capture, round the back. With this phone in hand, ripping all your Blu-ray DVD movies to it for getting super visual enjoyment.

sony xperia zx

Watching Blu-ray DVD movies on Sony Xperia XZ Premium could be very attractive, how to rip Blu-ray DVD to this new phone? It's very easy to finish this task unless you have got a professional Blu-ray/DVD converter in hand. There are lots of Blu-ray/DVD rippers in the world, the point is to find the best one. You are lucky today, I will share the most useful program with you, so you don't need to search on the internet.

Pavtube ByteCopy | Mac always stands out from its competitors which will never let you down. To make you know this software well, the following are its main features for your reference.

Key Features to Choose Pavtube ByteCopy

  • Powerful ability to bypass copy and region protection on a commercial 2D/3D Blu-ray disc. You also can import Blu-ray folder, DVDs, DVD folder, DVD IFO file, DVD/Blu-ray ISO Image file to this program.
  • Recently, Pavtube Blu-ray Rippers have upgraded to v4.9.2, added support for Blu-ray AACS MKB v63.
  • Copy and convert Blu-ray/DVD to various video/audio formats for your Sony Xperia XZ Premium, like H.264 MP4, AVI, WMV, MKV, and more.
  • This software allows you to lossless copy Blu-ray to Multi-track MKV format to help preserve Blu-ray 5.1 or 7.1 surround sound or other popular multi-track formats such as MP4, MKV, MOV for viewing on HD media players with multiple audio tracks and channels.
  • Massive copy options for you. You can 1:1 full disc copy Blu-ray movies with all the subtitle languages, audio tracks and chapter information well preserved, or only copy the main title without unwanted extras.
  • Massive optimized device presets like Sony, Asus, Samsung Galaxy Tab series, iPhone X, iPhone 8, Samsung Galaxy Note series, Xbox One series, Apple TV series, Wii U, Adobe Affter Effects, Adobe Premiere, and more.
  • This feature-rich software also work as a proferssional video editor. With it, you can trim BD/DVD movies length, add external subtitles to it, replace or mute audio, and more.

Steps to Play Blu-ray/DVD on Sony Xperia XZ Premium

Step 1. Load BD/DVD with this program

Install the best Blu-ray/DVD ripper on PC. then open it, click the "Load from Disc" icon to import the Blu-ray/DVD Disc. You also can load the BDMV folder, DVD folder by choosing the "Load from folder" from the dropdown list of "File", of course, you also can choose to load the ISO images too.

load Blu-ray

Step 2. Choose output format for Sony Xperia XZ Premium

Click "Format" bar, you will see hundreds of video formats here. You can navigate to "HD Video" and select "H.264 HD Video(*.mp4)". Or you can choose formats from "Sony" category.

set output formats

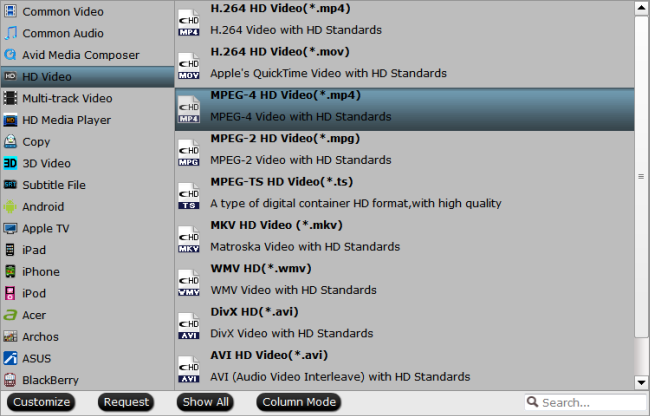
Tips: For those people who want to preserve multiple video/audio tracks you can navigate to "Multi-track Video" > "Lossless/encoded Multi-track MKV(*.mkv)" for output. You can get lossless audio streams without transcoding. At the video setting windows, you also can choose the chapters, audio tracks, and subtitles.

Output lossless multi-track MKV format with 7.1 audio

Click the Setting button and adjust the video. Here you can rip Blu-ray with Dolby 5.1 tracks, open "Multi-task Settings" window, click "Audio" tab, check "Encode" to get encoded MKV files with Dolby Digital 5.1 audio saved. In this way, you also can rip Blu-ray with original DTS-HD Master audio track.

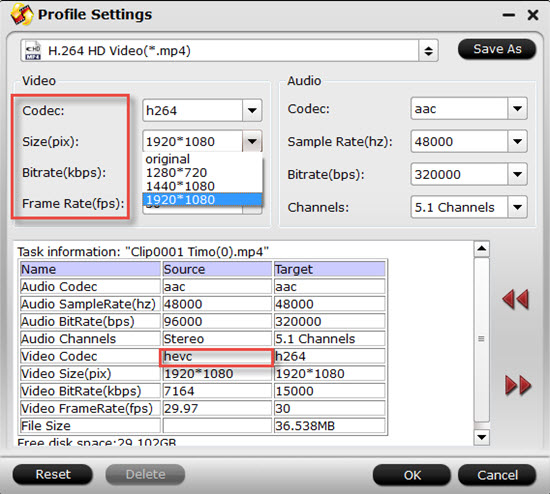
Step 2. Adjust video parameters

If you have defined the output format, then click the "Settings", here you can adjust vdieo parameters like: video/audio codecs, bitrates, frame rates, channels, etc.

Image result for pavtube video converter settings h.264 hd mp4

Step 3. Start the conversion

After all settings are done. Return back to main interface, and click convert, it will begin to copy your Blu-ray/DVD movies. Wait for a while, when it is over, click Open, and it will pop up a folder with generated files. Now you can transfer the covnerted movies to your Sony Xperia XZ Premium for watching on the 4K display.

Monday, April 23, 2018

How to Play 4K HEVC on Mac/Windows/ UHD TV?

4K is a big thing to TVs, and now 4K has become the leader in the market. However, the video with 4K resolution will takes up tons of storage space, and a considerable amount of bandwidth is required. So here comes the new technology - HEVC, aka H.265, giving you a way to store, transfer, share the 4K video easily.

4k hevc

What is HEVC codec?

High Efficiency Video Coding (HEVC), or H.265, is a video compression standard designed to substantially improve coding efficiency when compared to its precedent, the Advanced Video Coding (AVC), or H.264. HEVC promises a 50% storage reduction as its algorithm uses efficient coding by encoding video at the lowest possible bit rate while maintaining a high image quality level. This is a big deal to 4K video.

What is 4K HEVC?

4K HEVC is 4K UHD video encoded with HEVC codec, which is to offer the same level of picture quality as AVC (h.264), but with better compression, so there is less data to deal with. To put that another way, 4K HEVC enables a video to be compressed into a file of half size, or half the bit rate of H.264, but in same high quality. Although 4K HEVC is not ubiqutious, but it's happening - 4K Blu-rays are encoded in HEVC, MacOS High Sierra has wide compatibility of HEVC, Pavtube Video Converter Ultimate | for Mac gives you a way to switch AVC to HEVC for saving more strage space, and makes 4K HEVC playable on more devices.

But precisely owing to 4K HEVC is on the half way, the video compatibility may stop you from playing 4K HEVC on TVs, desktops or mobiles freely. Now, this article will show you the advantages and disadvantages of 4K HEVC, give you a reference for the minimum hardware for 4K HEVC playback on Mac and Windows and guide you how to play 4K HEVC, even at 60fps on TVs.

Pro of 4K HEVC:

4K Ultra HD (UHD) provides four times the pixel resolution of HDTV with 60Hz frame rate for smooth motion and 10-bit colour for a stunningly realistic viewing experience with striking visual details. And compared with H.264 codec 4K videos, the HEVC 4K takes up less, approximately 50% storage space, which means only half data are needed when streaming or downloading 4K HEVC videos. 

Cons of 4K HEVC:

On the other side, 4K HEVC is not so widely compatible as 4K H.264,  the overwhelming majority of old desktops and mobiles don't support 4K HEVC at all. Besides, HEVC decoding and encoding is so slow without hardware acceleration. Thus 4K videos choppy or stuttering happens frequently when playing on Mac/Windows without hardware acceleration decoding support.

How to Make 4K HEVC Playable on Mac/Windows/TVs?

To have a better experience for enjoying 4K HEVC on your TVs, iDevices, computers, or other monitors, if only you have got a super assistant in your hand. Why you need a helper for watching 4K HEVC videos? To be frank, no computer has a big enough monitor for 4K UHD video playback except the new 4K Retina 21.5-inch iMac and the 5K Retina 27 inch iMac. Even if you're able to play 4K video on Mac and Windows computer, the video itself has been downscaled in the background. More and more smarphone, TVs will add support for 4K HEVC video playback in the future, but not now.

A 4K HEVC player & converter is required, here I will share Pavtube Video Converter Ultimate (review) with you after testing a lot of 4K HEVC players. This software not only works as a 4K HEVC decoding software and allows you to play the video, but also as a professional 4K HEVC converter. With it, you can downscale 4K HEVC to 1080p, upscale 720p, 1080p to 4K HEVC, you also can convert HEVC 4K to H.264 video with SD/HD/4K resolution as you like.

Moreoever, you can customize video parameter like video audio codec, resolution, frame rate, bit rate, channels according to your needs. Below, I will show you how to transcode 4K HEVC for playback on your Mac, computers, and TVs on Windows. If you are Mac users, you can download the Mac version, its Mac version are the same operating procedures.

How to transcode 4K HEVC for playback on your Mac, computers, and TVs

Step 1: Load video files (h.265/hevc videos included)

Drag your files into this H.265 HEVC Video Converter, with "Add video"; you can load them with individual clips, or with "Add from folder"; you can import them with a complete folder. Batch conversion is also available.

HEVC Converter Ultimate

Step 2. How to encode or decode H.265/HEVC footage on Windows PC?

You can encode common video to H.265 mp4 video or H.265 mp4 HD video, you can find those two output formats under "Common Video" or "HD Video" main category respectively. Besides encoding common video to H.265, the program also has the capability to encode Blu-ray/DVD disc to H.265 MP4/H.265 MKV for storage with much small file size.
As for decoding H.265, you can easily decode H.265 video to various common file formats, devices(iPhone X, iPhone8/8p/7/7p/6/6p, Samung Galaxy Note 8, iPad Pro, Macbook) preset profile formats or video editing program best favorable editing codec from "Format" drop-down list.
If you want to output TV supported video formats, you can navigate your cursor to TVs category and select optimized device presets from its submenu, like Panasonic TV, Sony TV, and more.

HEVC H265 Converter preset

Step 3. Convert H.265 HEVC videos

Finally, don't forget to hit the "Convert"; on the main interface to finish your preparation work and get start. Just enjoy your H.265/HEVC videos!

Monday, April 16, 2018

Meet Trouble Editing Bandicam Recordings With After Effects? Solved!

Bandicam is an application that allows you to record everything that happens on your screen, including any program that uses graphic technologies DirectX or OpenGL, such as the majority of modern video games. The program's configuration options allow you to modify the quality and size of the video, the type of codex that you want to use, the frames per second, the channels and the bit rate of the audio, or even whether you want the mouse cursor to appear or not. Even though, people still meet trouble when they try to import Bandicam recordings to After Effects, which pop up a windows with this message "Unsupported format or damaged file", just like the question below, why this happened? Keeping reading.

"Hello, I know in AE your supposed to import your lossless video files, but I'm recording my screen using bandicam. It has a special codec that uses the gpu + cpu, and only works with NVIDIA CUDA graphics cards (which I have) and uses the H.264 format. The only container you can use is AVI. The problem is there really is no lossless codec, and since this codec uses the gpu as well, the videos turn out spotless. Amazing quality and amazing fps. So I really want to use this codec, but AE wont import it. It says its an unsupported format."

So to output the formats with best settings for Adobe After Effects video editing, there are two ways for you. One is to utilize Bandicam itself to output different video container with different codec. As you can see from the picture to make it clear.

Bandicam - Best settings for Adobe Premiere, video editing

bandicam

AVI: Bandicam settings for Adobe Premiere (Recommended for most users)

To edit the recorded video with Adobe Premiere with the AVI container, choose the "Motion JPEG and PCM" codecs. 

Motion JPEG (M-JPEG or MJPEG) is a video format in which each video frame is a JPEG image, therefore each frame is a keyframe, so you can edit the recorded video easily.

avi

MP4: Bandicam settings for Adobe Premiere (Recommended for advanced users)

To edit the recorded video with Adobe Premiere with the MP4 container, choose "Prefer CFR".

Adobe Premiere doesn't support VFR (Variable Frame Rate), so you have to choose the "Prefer CFR" option to edit the recorded video in Adobe Premiere.

mp4 bandicam

* Caution) If the encoder's performance is not good enough, the video will be saved as VFR and you could have the video and audio syncing issue. In this case, you have to use the "Motion JPEG" and "PCM" codecs or Sony Vegas. If you have the syncing issue with the "Motion JPEG" and "PCM" codecs, you have to reduce the video resolution of the recording target.

The other solution comes as the best way to solve the problem. You have to get a Bandicam to After Effects video converter, to make it short, here I will share my video converter with you which is called Pavtube Video Converter Ultimate, it is a professional and easy-to-use software to convert any video formats and Blu-ray/DVD to supported  format like MPEG-2 for editing in After Effects any version. Besides, it also features some practical editing functions, including mergeing clips, trimming movie files, adding subtitles to your original files, replacing audio tracks, etc. catering for your different needs.

With it, you can effortlessly convert your DVD files including DVD discs,  DVD Folder, DVD IFO File, DVD ISO Image File for smoothly importing and editing in various non-linear editing systems (NLE), including After Effects, Adobe Premiere, Final Cut Pro, iMovie, Avid Media Composer, Davinci Resolve and more.

Now download the best Bandicam to After Effects Converter and follow the tips below to achieve your goal smoothly.

try mac

If you are running a Mac computer, please turn to the alternative Mac version: Pavtube iMedia Converter for Mac.

Easy steps to convert Bandicam recordings to After Effects editable video

Note: This guide takes the Windows version screenshots for example. The way to convert Bandicam recordings to After Effects on Mac OS is the same. Just make sure you get the right version.

Step 1. Import Bandicam Recordings

Download the video converter for After Effects from the above button. After the download is over, run it and click "File" to add source Bandicam recordings into this tool for After Effects as well as other editing systems like Adobe Premiere, Avid Media Composer, etc.

On the main interface, there is a preview window provided for you to preview the Bandicam recordings to ensure the files are what you want to rip. You can also take snapshots of the Bandicam recordings when previewing them.

add dvd

Step 2. Choose After Effects native format - MPEG-2

Click "Browse" to set the output path to save the converted videos and choose the output format. Since we have known the best format for After Effects CC, just go to the output format list where you need to follow "Adobe Premiere/Sony Ve…"> "MPEG-2 (*.mpg)."

convert mp4 to mpeg 3 for premiere elements

Tip: Adjust video and audio settings

Click "Settings" button and customize proper video/audio parameters including Video size, bitrate, fame rate, Audio codec, sample rate, audio channels and more.

Step 3. Convert Bandicam recordings to After Effects

Click on the "Convert" button which is red in right bottom screen to start converting Bandicam recordings to MPEG-2 - the perfect format for After Effects to import and edit. Just wait for the process to finish. After that, you can get the converted videos and just open After Effects and import the converted videos for editing.

The main steps of how to use After Effects are listed below:

1. Start After Effects.

2. Create a "new composition" either using the traditional method or by simply using the short cut keys "Ctrl+N".

3. Save the new composition as a new project by clicking File>Save.

4. Now import the required files into the workspace in your newly created composition: File>Import>File. You can also build a composition through layers and edit these layers from the edit tab.

5. Now you can simply drag and drop files from the "project tab" to the "timeline tab", "composition tab" or "layer tab".

6. You can also transform your 2D layers by bringing the cursor over the composition tab and zooming in or else wise by by "scrolling out".

To move a 3D layer press "cmd+W" for mac or "cntrl+W" for Windows.

7. Lastly, you may add animations, effects and presets by visiting the "Transform" or "Contents" Tab.

8. Click Windows>Effects and Presets for further options.

9. Save all your work before exiting After Effects.

Monday, April 9, 2018

Easy Solution to Extract SRT Subtitles from Blu-ray Movies

“My goal: I want to extract subtitles from Blu-ray Alice in the Wonderland to srt.file. I plan to add extracted srt subtitles in English to my downloaded movie for private use such as learning English. I have evaluated several programs but sadly find that in the test version the subtitle extractor is not included. What a pity. Could you do me a favor and recommend something to me?”

Subtitle always plays an important role in the movie, in many circumstances, we need SRT subtitles extraction. For example:

1. Need add SRT subtitle to downloaded movie or video 
2. Media players cannot subtitle Blu-ray PGS subtitles
3. Store SRT subtitles for later usage

In here! Read the following post to get the easiest way to extract subtitles from Blu-ray movies, moreover, we have listed the top 10 subtitle download sites that are safe and flexible. Make sure you are not downloading any malware or getting any virus to harm your computer when you just simply want to download subtitles.

Part 1. How to Extract SRT Subtitles from Blu-ray DVD Movies

Before we get to start the extraction process, one thing you have to prepare in advance - a super extractor. Here we will share a professional software with you which is called Pavtube ByteCopy (Top 5 Blu-ray Rippers). This software not only enables you to export single SRT subtitle file, but also could help you backup Blu-ray/DVD to MKV with multiple audio/subtitle tracks without video quality loss. Besides, this software could backup all your commercial Blu-ray movies bypassing the region and copy protection and convert them to MP4, MOV, AVI, MKV, WMV, etc for playback on media players and portable devices.

Besides extracting subtitle from Blu-ray/DVD movies, ByteCopy also enables you to add forced subtitles to Blu-ray/DVD movies when there are alien languages which are different from your mother tongue or add additional SRT/ASS/SSA subtitle to converted videos.

Step 1: Load Blu-ray/DVD disc to the program.

Connect your Blu-ray drive with your computer and then insert your Blu-ray disc into the drive, then click "File" menu, from its drop-down list, select "Load from disc" to load Blu-ray files to the program.

load blu ray

Step 2: Select output file format.

From the "Format" drop-down list, select "Subtitle File" > "SRT Subtitle(*.srt)" as the desired output file format.

select srt subtitle file to otuput

Step 3: Select subtitles by languages.

Click “Settings” to open "Multi-task Settings" window to select subtitles by language. Check any language you’d like to keep. You can either keep native-language subtitles only or multiple subtitles in different languages.

select subtitle by languages

Step 4. Extract SRT subtitles from Blu-ray/DVD movies.

Press the right-bottom red “Convert” and start extracting *.srt subtitles from Blu-ray DVD process.

When the SRT extracting process is finished, click “Open output folder” to locate the generated files, you will get all the subtitles in English, Italian, Spanish… Which is exactly the same as in your original disc. For this situation, you need choose the English subtitle for study.

Sometimes, the extracted SRT subtitles may not what you desire to get, you can still use our program to add additional SRT/ASS/SSA subtitles to movie files. Just open the "Edit" window, switch to "Subtitles", check "enable", you will be able to add your desired subtitles to your converted files.

Part 2. Best Websites To Download Subtitles For Movies

Subtitle Download Sites Descriptions
Moviesubtitles.org

The largest collection of subtitles for movies, here you can find subtitles for the most popular movies and TV series. Moviesubtitles.org offers multiple-language subtitles, and all subtitles here are packed with WinZip, you must unpack to use it. 

Subscene Subscene.com is the most widely used subtitle download site among the others, this Indonesia based subtitle download site offers the richest resource in Indonesian, and Arabian. No matter you want to watch South Korean soap opera or American Hollywood movies, and it got a great deal of loyal users and contributors.
Open Subtitles Subtitles free download for DivX movies, search in many languages from a multi-language website. Thousands of translated subtitles for XviD movies and TV series. You can download tonnes of DivX subtitles from the biggest Open Subtitles database.
DivX Titles DivxTitles.com is a place where you will find every single DVD or DivX subtitle you are looking for. There are 135218 DVD and DivX subtitles in their database so its unlikely you will not be able to find subtitle for your movie or TV show.
DivX Subtitles DivXSubtitles is well detailed with crucial information on all the latest movie subtitles in the market. There is the date of release, title of the movie, language used and its uploader, which makes it easy to choose the best subtitles to download.
Subtitles Box Subtitles Box uses divx subtitles for your favorite movies, free subtitles downloads, movie & subtitles news and gossip, actors and celebrities profiles update, hot new stories about movies and movie stars, a divx subtitles calendar with all the hot dates in movie industry this year.
My Subtitles In My Subtitles, you can download all the Subtitles of the DivX Movie Database hosted by MySubtitles.com. You can also upload subtitles by registering in My Subtitles. You can download all the latest subtitles for free.
All Subs All Subs contain all the subtitles in all the famous languages. You can download subtitles of all the DivX movies.
TVsubtitles.net TVsubtitles.net is famous for its diversity of TV program subtitles, on this subtitle download site you are free to find and download subtitles of TV shows, Talk shows, Netflix TV Series, Hollywood movies, etc.
SubtitleSource This site supports three main formats namely XviD, DivX and x264. They are all well suited for TV series and movies so make sure your searches are precise in relation to quality and language.

Monday, April 2, 2018

Best Online MTS to M4V/MOV Converter Alternative

MTS is a file format which is used to run high definition videos. MTS is often saved in AVCHD (Advanced Video Coding High Definition) created by Panasonic and Sony High Definition Camcorders. Both 720p as well as 1080i are supported by this file extension. To play or edit MTS files, you need more powerful software to handle it cause that normal video players can't support MTS files. Many popular NLE software can't accept MTS files, neither. Fortunately, there are many online MTS video converters on the internet that can help you convert MTS files to other popular video and audio formats. For example, if you want to play or edit MTS video on your Mac, converting MTS to M4V/MOV will be a good choice, M4V/MOV are developed by Apple which can be play and edit smoothly on you iDevice.

mts files

Convertfiles.com is an online based platform that can be used to make file converts from MTS to M4V/MOV with the greatest ease and convenience. Follow a simple three step process and you are good to go. First upload the MTS file, select M4V as the target file that you need and finally click on convert file. The process will run quick before a download link pops up for you to make your download or end it to your email. The quality of your data is retained through the conversion process. 

However, this MTS to M4V/MOV converter has many limitations which brings us lots of inconvenience, for instance, you have to leave your private info to this website. Apart from Online MTS converter, there are also many desktop MTS to M4V/MOV converter software that can enable you to re-encode MTS files. Among the many Online MTS converter alternatives, Pavtube iMedia Converter for Mac | for Mac is the best one. It is  is specially designed for Sony, Canon, JVC and Panasonic AVCHD Camcorder/camera owners to convert recorded AVCHD MTS videos to various video formats for easily editing in editing software, like Final Cut Pro, iMovie, Adobe Premiere, Sony Vegas, Cyberlink PowerDirector, Avid, Magix Movie Edit Pro, Windows Movie Maker and so on. This program help users to convert camcorder recorded MTS/M2TS footages to playable video formats for Apple TV, iPad, iPhone, iPod, MacBook, Samsung Galaxy Tab, Samsung Galaxy S, Amazon Fire TV, Xbox One S, PS4 Pro, Roku, Android phone, etc. 

Key Features
* Fully Support interlaced and progressive AVCHD 3840*2160, 1920*1080, 1440*1080, 1280*720 videos shot with Sony, Panasonic, Canon, JVC, etc. 
* Freely customize output video/audio settings, including Codec, Size(Resolution), Bitrate, Frame Rate to export your desired video 
* Convert AVCHD (.mts/m2ts) footages to editable video formats, like DVCPRO HD (*.mov), HDV (*.mov), Avid DNxHD(*.mov), QuickTime(*.mov) for easily editing in FCP, AVID and playback on iDevice.  
* Provide optimised presets for Apple devices and Android Tablets/phones. 
* Simply merge multiple MTS footages into big one just with one click 
* Accurate trim and crop MTS (*.m2ts or *.mts) videos 
* Split the selected video file into required video clips by specifying clip quantity, duration time and file size. 
* Add text, image, and video watermark to protect self-made clips 
* Replace original audio to make your desired video story 
* "Darg-and-Drop" and "Batch Conversion" features are supported.
*More than a MTS to MOV converter(review).

Quick Guide: Convert MTS Files Using Online MTS Converter Alternative

Step 1: Import MTS/M2TS videos on Mac

Click "Add File" button to open the file browser window and navigate to the MTS/ M2TS files you would like to convert. Or drag-and-drop files stored on your computer to the interface of this MTS converter. It supports batch conversion, which allows you to import and convert multiple video files at a time.

mac

Step 2: Choose MOV/M4V as output format

From its drop-down format list, navigate to "HD Video", you will see dozens of video formats in its submenu.

Output high definition HD MOV file format

Output format for HD TV

Output QuickTime MOV file format or M4V-MPEG -4(*.M4V)

Image result for site:multipelife.com quicktime mov

Output Apple InterMediate Codec(AIC)(*.mov) for iMovie

Image result for site:multipelife.com quicktime IMOVIE MOV

Output Apple Prores 422(*.mov) for Final Cut Pro

Image result for site:multipelife.com quicktime IMOVIE MOV

Edit MTS Files Before Conversion

If there is a need, you can edit your MTS video files by clicking the "Edit" image button. You can trim, crop, add effect, watermark and subtitle to your videos.

TrimDrag the two sliders to select the segment you want, and then click scissor icon and OK button. In this way, you can cut off any clip you don't want.
Crop: Drag and drop a dotted rectangular box to choose any screen area of the video. Immediately, the selected video area will be enlarged in the preview window.
EffectOffer you a lot of cool effects that you can apply to the video.
Watermark: Add image or text watermarks to personalize your video.
SubtitleAdding subtitle files is available in this program.

EDIT MTS

Step 3: Convert MTS while keeping HD-quality 

After all the settings, now, just click the "Convert" button to start converting .mts to .mov, .m4v file. After the conversion, you can locate the generated files in the output folder.

Now, you can play your AVCHD MTS files on VLC, KMPlayer, iPhone, iPad or edit your MTS files in Final Cut Pro, Premiere Pro, Sony Vegas Pro, etc.